
This article explains in short the specific settings that should be done on the S3DTF75 to make it work for DTF application. The S3DTF will have to be setup for the DTF as the unit will not work for this specific application new out of the box.
S3DTF75 content
The S3DTF75 is basically a bundle that Summa offers where all equipment is inside to run DTF applications.
S3DTF75 consists of:
| S3TC75 SUMMA S CLASS 3 75 | Summa’s proprietary tangential cutting technology with camera technology |
| S CLASS 3 75 ROLL-UP system | Summa's well know Roll-Up system designed for S Class 3 |
| S CLASS 3 75 ROLL SUPPORT (FOR DTF) | "Frictionless Roll Feed" designed to prevent the scratches or roller marks that typically occur when transporting PET film. This was specific designed for the DTF application |
| GoSign PROPACK | License key to fully support the camera functionality of the S3TC75 unit |
S3DTF75 installation
Build up of the unit:
| S3TC75 SUMMA S CLASS 3 75 | S Class 3 - Roll Cutter Complete Installation |
| S CLASS 3 75 ROLL-UP system | S Class 3 - Assembly instructions for the Roll-up system (MI9135) |
| S CLASS 3 75 ROLL SUPPORT (FOR DTF) | S Class 3 - Assembly instructions for the DTF roll support (MI9136) |
| GoSign PROPACK | GoSign User manual |
S3DTF75 configuration
The S3TC75 machine needs to be configured for the DTF application. Some basic parameters need to be taken care of to be able for your cutter to process DTF jobs. Below you will find some suggested parameters, fine tuning could be necessary when these do not work or do not provide expected results:
| Calibrate media (OPOS) | set value on -75 | ||||||||||||||
| FlexCut settings (start values) |
| ||||||||||||||
| FlexCut settings (fine-tuning) | Minor tweaks may be necessary when you make first test cuts (rectangles). Some settings that have infuence on the integraty of the material are mainly:
| ||||||||||||||
Job design | Make sure to use rectangle for FlexCut as the material is often not rigid. Make sure the printout is centerd to the page, it will provide more stable production in media transport but also when "Colorbars" are printed it will not interfere with the OPOS reading. Colorbar:  | ||||||||||||||
| Loading media |
|


DTF and Printer RIPs
Automation is also possible if your rip allows to mirror the PostNET barcode which is printed alongside the print. The PostNET barcode still needs to be positioned on the bottom right hand side of the print.
DTF on S One
Cutting DTF on S One is also possible however in that case you will need to cut the DTF prints with the print visible towards the top. Glue side facing downwards:

It is not the perfect setup as the glue will touch the base and there is no friction free feeding system. Also the S3DTF75 has more flexibility with the camera system.
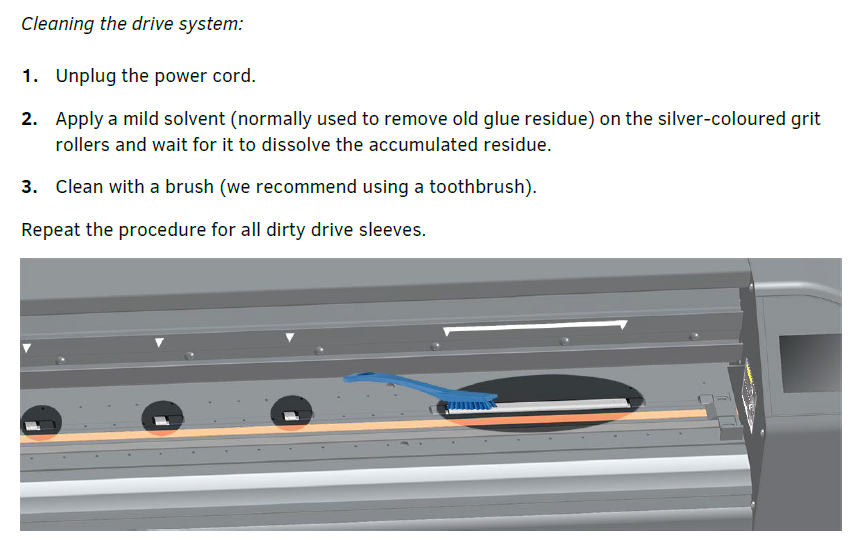
DTF maintenance
We have observed significant and rapid contamination of the drive drum grid rollers on the Roll Cutters when using some of the DTF film. This contamination leads to clogged sleeves (grid rollers). As a result, the imprint (micro-perforation) of the grid rollers on the backside of the film becomes insufficient, leaving inadequate tracking marks. Consequently, the material may start to shift randomly during operation, creating offsets in print&cut or media crashes.

To resolve this issue, regular cleaning of the grid rollers is essential. Follow the procedure outlined in the user manual under “Cleaning the Drive System”
DTF Trouble shooting for Tracking and Cutting issues
Symptoms
- Media shifts randomly during cutting.
- Multiple cuts on the same line or diagonal cuts across the design.
- Loss of stability in the material during cutting.
Step 1: Check Pinch Roller Pressure
- Inspect both outer pinch rollers.
- Ensure both left and right pinch rollers are used.
- De-activate middle pinch rollers to ensure it doesn't create any other tension on the material
Step 2: Inspect and Clean Grit Rollers
- Look for contamination or buildup on grit rollers.
- Clean using Isopropyl Alcohol and toothbrush
- For best results, use a soft brush (e.g., toothbrush) to remove debris from grooves. Use a none metallic brush to prevent damaging the grid rollers
- Tip: Create a regular cleaning schedule when cutting DTF media.
Step 3: Verify Cutting Settings
Check:
- Blade depth
- FlexCut settings
- GridCut settings
Recommended tweak:
- Increase FlexCut bridge length for better stability
- Decrease Full Pressure Length
- Reduce the Panel size
Perform test cuts with scrap DTF media before production.
Step 4: Inspect Job Files
If unexpected cuts occur (e.g., diagonal lines or repeated outer lines):
Review the file generated by the software - contact your supplier of the software when required
Check for extra bounding boxes or stray cut lines.
For testing you could use Corel/Illustartor to make square boxes representing the job and cut the job using GoSign (Windows based Summa cutting software)
Step 5: Production Tips
Center print jobs on the media instead of aligning left or right.
This simplifies loading and improves tracking, especially when color stripes are printed.
Some example images:
 | Media crash due to cut out parts coming loose | Fine-tune the settings of the FlexCut:
|
 | Media starts to shift randomly | Tracking performance:
|
 | Shift in print and cut - cut does not meet-up with the pirntout | This could also be related to the tracking performance. When you see the tracks on the back are not clean |
For more details on the setup see document attached.
Was this article helpful?
That’s Great!
Thank you for your feedback
Sorry! We couldn't be helpful
Thank you for your feedback
Feedback sent
We appreciate your effort and will try to fix the article